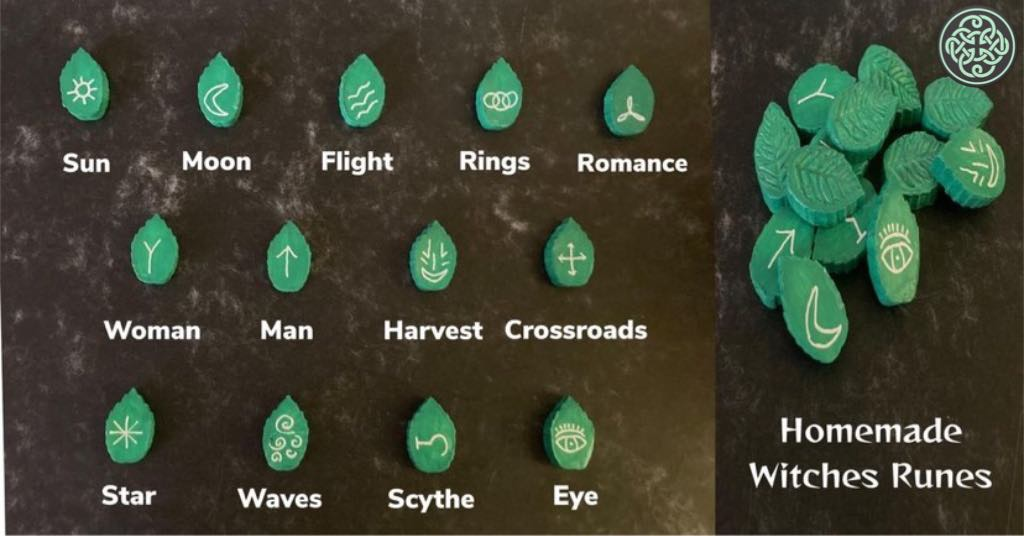
Homemade Witches Runes
To make your own set of witches runes you will need…
Air drying clay
Clay cutter
Paint and Brushes
Sculpd matte varnish or similar
Roll out the clay until it’s about 5mm thick. To ensure even surface I tend to place a pencil on either side of the clay while rolling.
Cut out your shape with the cutter of your choice. I’ve used a leaf plunger cutter.
Place your shapes out to dry for at least 24 hours: turn over half way through to make sure it’s fully dried.
Once your shapes are dry you can paint them in any colour you wish: be mindful you may need to do a few coats. Again let them dry for a good couple of hours between each coat and then you can paint on the symbols of the runes.
Once they are fully dry you can coat them with some Sculpd matte varnish to finish them off.
The rune meanings…
SUN: this symbolises something new is about to begin, making good choices in life and good news. The Sun also donates vitality and good health.
MOON: this represents transition, changes and hidden agendas or secrets. It also shows feminine energy and imagination.
FLIGHT: this denotes all kinds of travel, movement, communication and information.
RINGS: this symbolises connection with people and the joining of different things to create something new: synergy and sharing.
ROMANCE: this shows deep emotional connection – soulmate, love, relationships and harmony in your life.
WOMAN: this represents traditional female abilities and characteristics as well as healing, creativity, caring and nurturing.
MAN: this denotes traditional male characteristics, protecting your loved ones, being a provider and empowerment.
HARVEST: this symbolises investment in self, education, blessings, rewards and providing for yourself (independence).
CROSSROADS: this shows there are many ways to reach your goals. It also denotes feeling stuck, not knowing what to do next and decisions that need to be made.
STAR: this represents freedom – a green light to go after what you desire. It also shows your life’s purpose – pay attention to the runes that are near by.
WAVES: this symbolises a deep connection to the spiritual world and being in flow with your life. It also denotes a feeling of insecurity and being overwhelmed.
SCYTHE: this represents sudden changes and endings, completion of tasks, making a final decision or walking away from something – cutting the cords.
EYE: this symbolises the lifting of the veil, seeing the truth and witnessing. It can also show what you should be focusing on in your life – again pay attention to runes that lay near by.
Happy crafting witches.
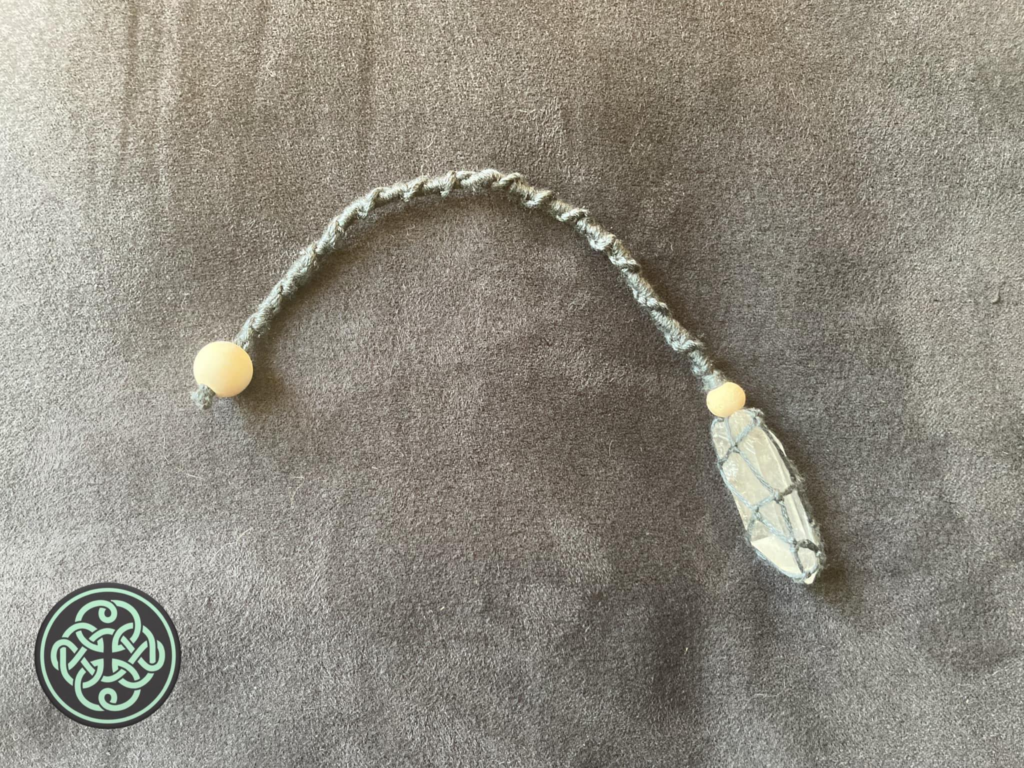
Homemade Pendulum
What you will need…
A couple of beads
A Crystal of your choice: I’ve used clear quartz
Embroidery floss
This one is super easy to do and may even bring back memories of making friendships bracelets when at school.
Firstly you need 3 equal strands of the embroidery floss – Mine were about 30 inches long.
We are going to wrap our Crystal by tying a series of knots around it. I have included a tutorial video from createwithjenn YouTube channel at the bottom of the post.
Once the crystal is sitting in it own little string net we are going place a bead all the strands of string ensuring our crystal is secure. Doing this also allows you to interchange the crystal if you wish.
Next you need to tie a knot just above the bead so we can start to create the hanging part of your pendulum. This is where we pull those memories out from our heads about making friendship bracelets at school.
We separate 2 out of the 6 strands of floss and we are going to create a number 4 shape by crossing the 2 strands over the other ones. We then are going to come back on ourselves going under the remaining strands and running the end through the loop you have created and pull up to tighten. Repeat this step until you are left with about 6 inches left on the 2 strands you’ve been working with. We are going to place those 2 strand back into the bunch and then take 2 of the longer ones and continuing the previous step. Again when you have about 6 inches left join them back in the bunch and take out the last 2 long strands and continue to knot.
Once you have completed your knots and have a few inches of floss left we are going to place another bead on and tie a knot vibe the bead to secure. You can snip off any excess floss.
Createwithjenn YouTube tutorial :- https://youtu.be/a4tMyWXZQ48
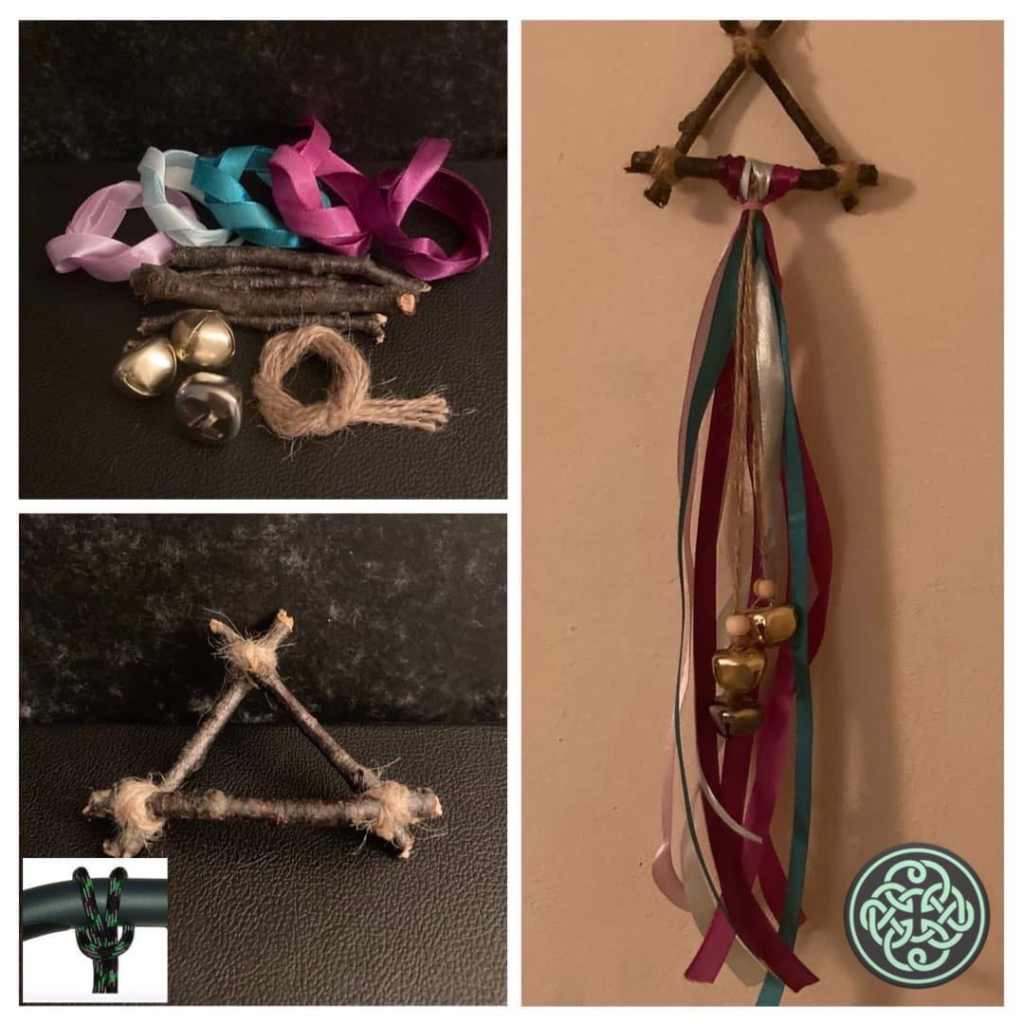
Homemade Witches Bells
Witches bells have been used for hundreds of years as a way to ward off negative energy and/or unwanted spirits.
They are usually hung near/on windows and doors in the home and not only can they banish the unwanted but the vibration that is created from the bell ringing can also invite energetic influences of a more positive nature.
There is a well known chant that usually accompanies witches bells.
I am unsure of its origins but I first came across it a few years ago on Pinterest
“Guard my home, bells on the door.
Let only blessings, walk on this floor.
Block all evil, and the dark arts.
May only good approach, our hearts”
Making your own witches belts is super easy, all you need is…
Some twigs (please only use twigs that have already fallen)
Twine/string
Some small bells (however many you’d like, even old keys would work for this)
Optional extras…
Ribbon, beads, charms and embellishments (for decoration).
First make a shape with your twigs securing where the twigs meet with your twine/string.
Next tie your bells to a piece of string and secure onto your shape with a larks head knot (pictured bottom left corner).
Once your bells are secured you can add your ribbons, charms etc to your shape.
When completed and you are happy with them hang on a door or window while repeating the above chance to activate.
Happy Crafting
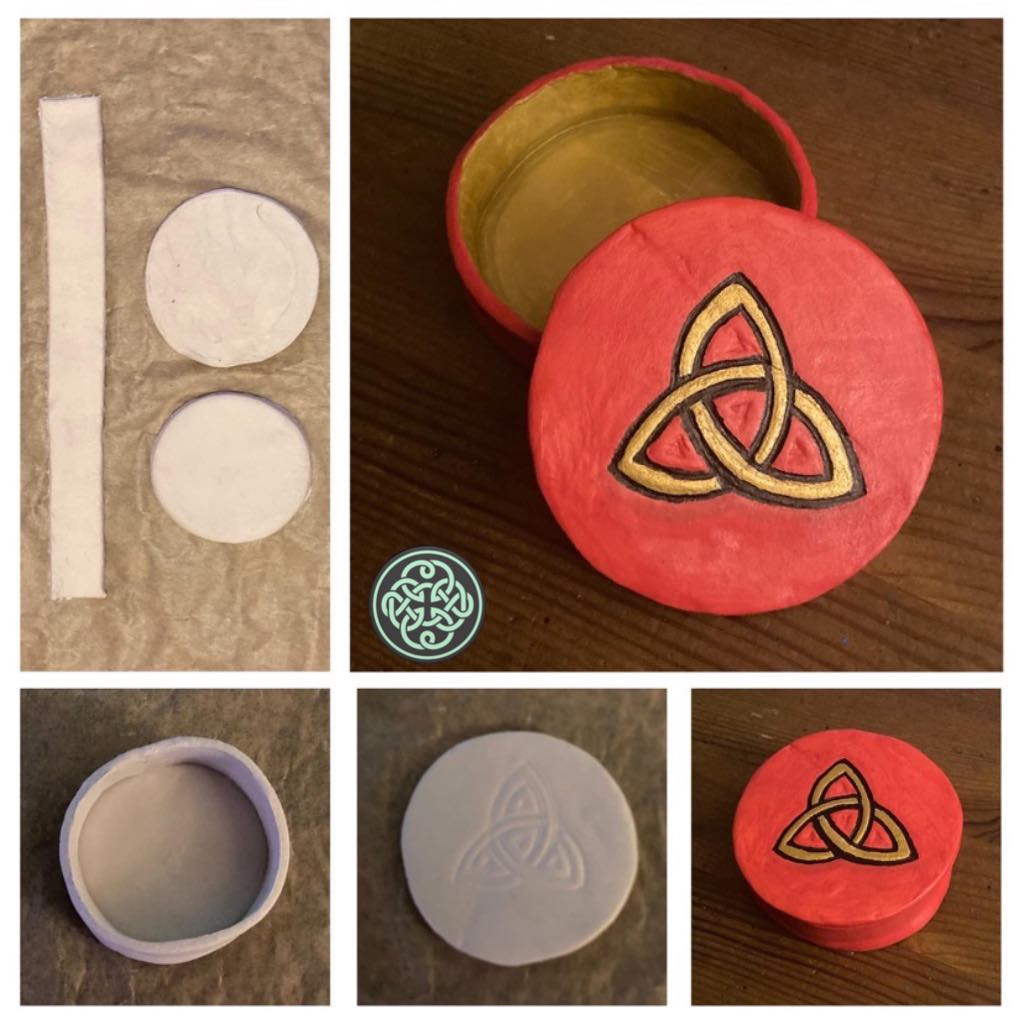
Homemade manifestation box
A manifesting box is a tool you can use to help focus your manifesting. They are also known as wish, intention or vision boxes and are usually filled with items such as herbs and crystals that correspond with your intention. If you wish you can also write your intention on a Bay leaf or alternatively a slip of paper.
Here we are going to make a home-made manifesting box using air drying clay.
For this you will need some air drying clay, a small glass of water, some acrylic paint and some clay sealant. I have used Sculpd (available on Amazon).
First you will need to roll out some clay – place a couple of pencils each side of your clay so you can get an even and smooth surface.
Any imperfections can be smoothed out by wetting your finger and gently going over the imperfection.
We are going to create a circle around 6.5 cm across which will act as the base of our box.
We are going to cut out a second circle about 7 cm across which will be our lid.
And finally we are going to create a strip of clay around 20 cm in length and 1.5 cm in width.
Please note the thicker the clay, the longer it will take to dry. If you wish to stamp your clay, now is the time to do it.
Next we are going to wet a finger and run it around the edge of our base circle and along one of the long edges of the strip.
We are going to attach the strips wet edge to the outside of the base circle creating a bowl shape. You can smooth the joints with your wet finger ensuring everything is secure.
Once you have completed the above step you can leave your clay to dry. Bear in mind this can take between 24 and 48 hours.
Once your clay is completely dry you can paint it in any colour you wish. You may find that you have to apply a second coat of paint if using a lighter colour.
Then once your paint is dried you can seal your manifesting box using Sculpd or similar.
Once your sealant is cured you can start to use your manifesting box.
Happy crafting
Paper craft
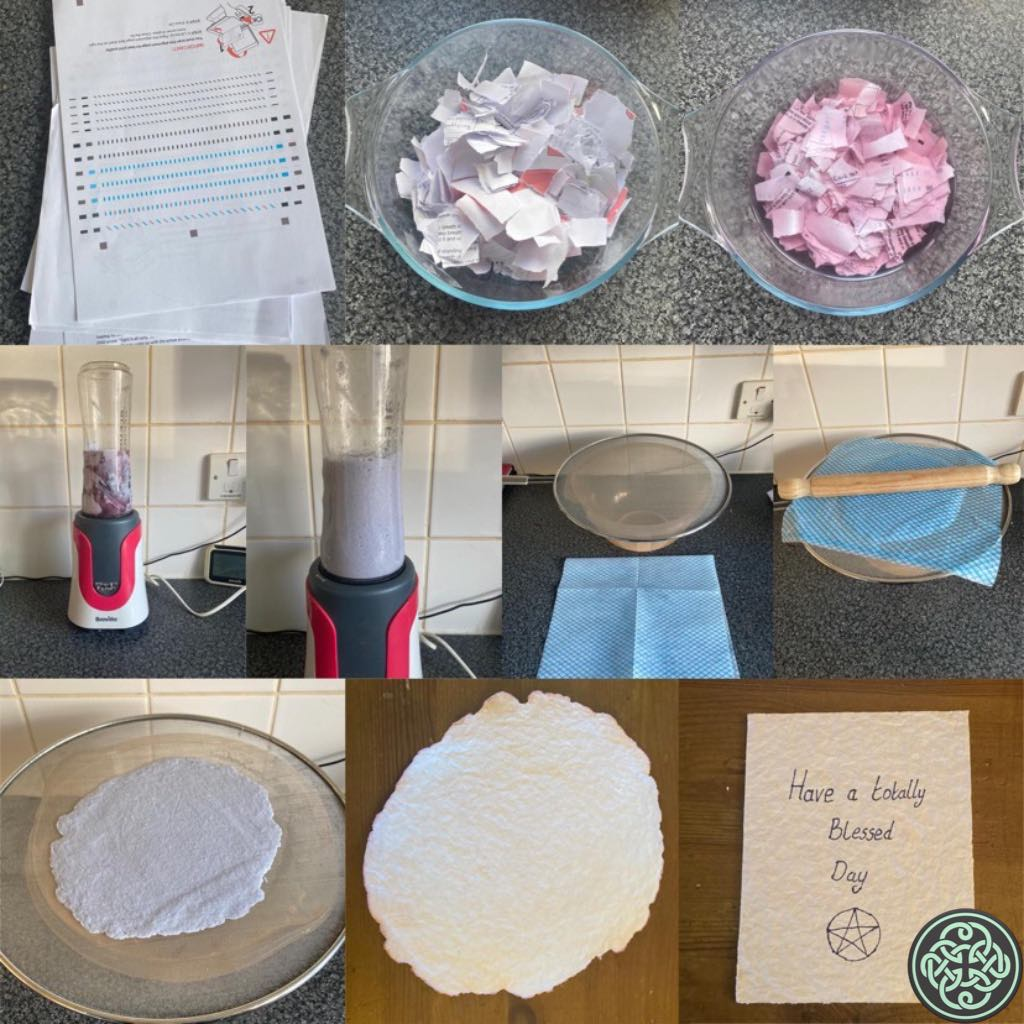
Today we are going to be making our own paper for you to write your spells, rituals, manifestations or even to use as book of shadows pages.
You don’t need any fancy tools for this and we will be using recycled materials.
For this craft you will need…
A kitchen splatter screen.
Some old scrap paper/newspaper/magazines.
A large bowl
Boiled water
Rolling pin
Cotton cloth
First tear your paper into small pieces and soak in the boiling water for between 30-60 minutes. I’ve used around 2 cups of paper and 2 cups of water.
After 30 to 60 minutes put the water and paper mixture into a blender and blend until it forms a pulp.
You can add food colouring to create coloured paper for use in specific spells, rituals and blessings.
Next you are going to put your splatter screen over your large bowl and pour your mixture onto it.
Push your mixture towards the edges then place your cloth over it and start to roll the water out of your pulp with your rolling pin.
Once you have gotten all the water out slowly peel away the cloth & leave your paper to dry – this can take 24 to 48 hours depending on the thickness.
When your paper is completely dried carefully remove from it from your splatter screen and trim to your desired size.
Happy crafting
DIY Altar Broom
The witches broom or besom A tool that has been used for centuries to cleanse, purify and protect. The broom represents the air element.
We are going to be making our own mini brooms to use on your altar or in your sacred space.
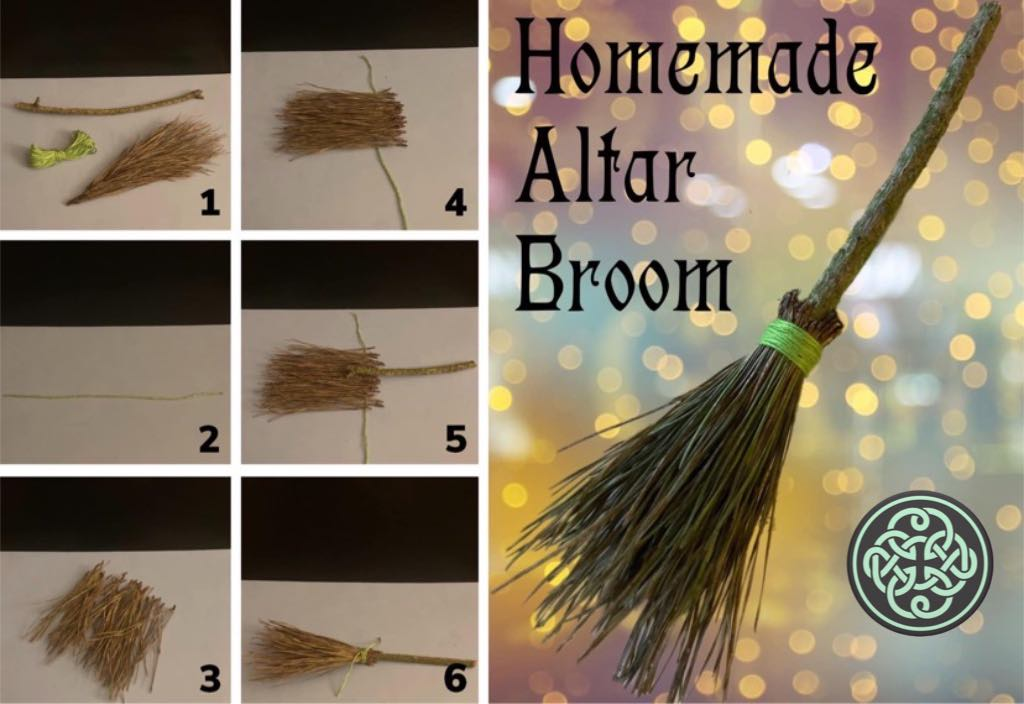
For this craft you will need… (see pic1)
A stick-twig (about the same size as a pencil)
Yarn/String/Ribbon
Pine needles – which corresponds to protection, healing, resilience, wealth and fertility. Pine also corresponds to the element making Pine needles the perfect materials for craft. (Please only use needles that are on the ground – wind fall)
Charms/Embellishments/Crystal beads.
First; cut a length of string approximately 6 inches in length and lay on a flat surface. (pic2)
Next you need to ensure all the Pine needles are separated (pic3) so they can be laid over the top of the string. (pic4)
Once you have all your pine Needles laid out, place your stick on top (pic5) and using the string we are going to wrap the needles around the handle and secure with a double knot.
You can wrap some additional strings/yarn/ribbon around the top of the bristles and feel free to add any chance/embellishment that you wish to include to finish.
Happy Crafting
DIY Herb Dryer
As witches we go through a lot of herbs and if you are anything like me you will have bundles of herbs hanging all over your kitchen.
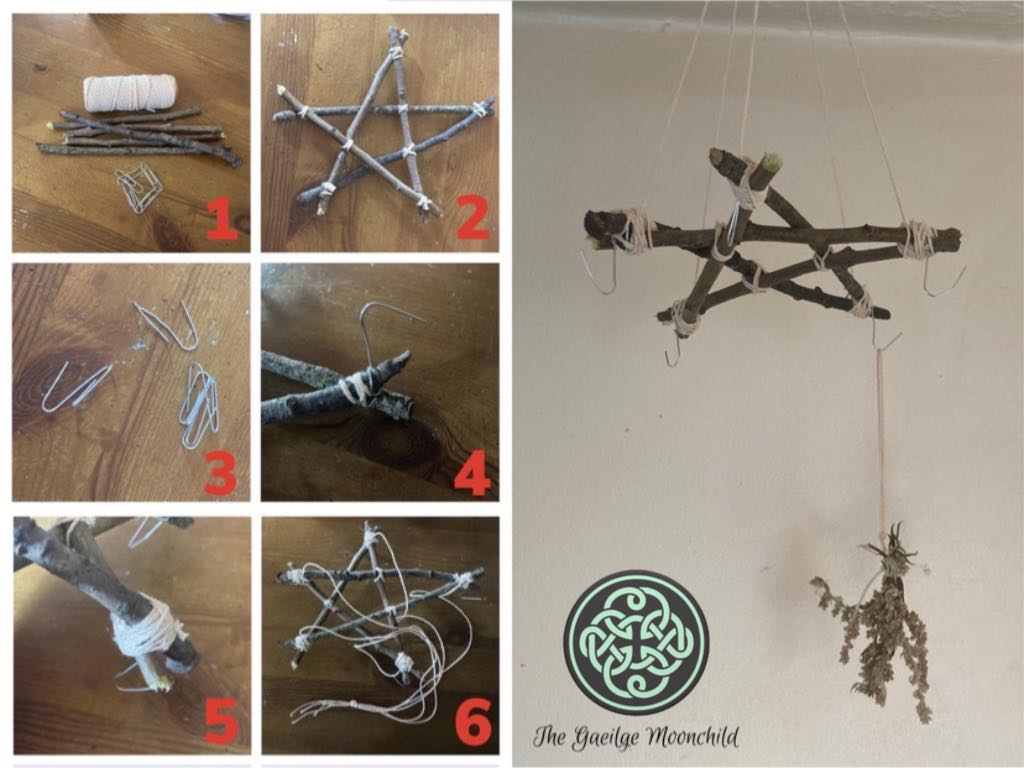
Today we are going to make a hanging pentagram herb drying rack so you can keep all your herbs organised.
For this craft you will need…
Five sticks of similar length
A ball of twine/string and
Five paperclips (pic1)
First we are going to lay out our sticks in a pentagram shape and start joining the points together with string securing with a tight knot. (pic2)
Next we are going to bend our paperclips into a hook shape (pic3) and attach these to the points of your star. (pic4) you can secure these with a little more string/twine (pic5).
The last step is to cut five lengths of string/twine and tie them onto your pentagram before joining them together with a knot after the top of the string. (pic6)
Once all the steps are complete hang in your kitchen.
Happy crafting
Making your own wand
When you hear of the word wand, your mind may be transported to the likes of the plastic black and white ones used by stage magicians or, the array of wands sold at Ollivander’s in Diagon alley in the Harry Potter series.
Wands have been used by those who practice the craft for centuries. The earliest mention of wands used in the occult is in the 13th century literary work The Sworn Book of Honorius or in Latin Liber Juratus Honorii.
Wands are usually made from wood, but you can also use metal plastic or resin. They are a versatile tool as they can be used for all sorts from casting a circle, drawing symbols in the air & directing your energy to name just a few.
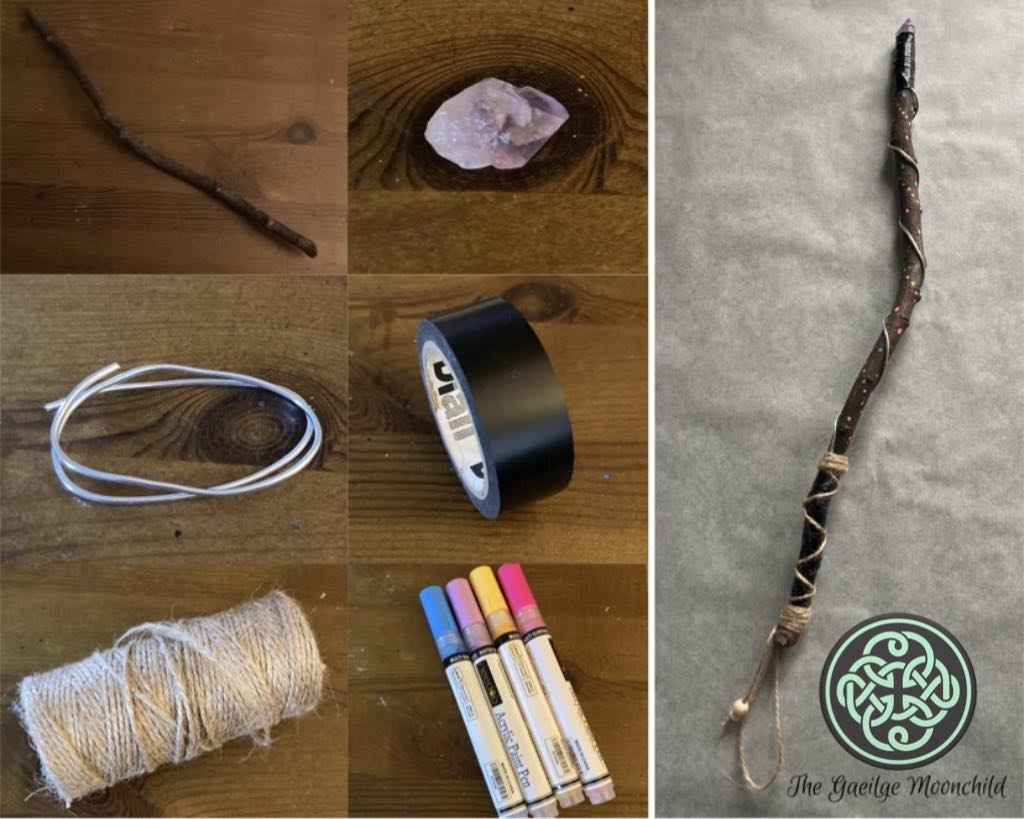
To make your own wand, head out into the woods and look for sticks on the ground – you don’t want it to be too long or too short. Take your time when choosing and always go with what you are pulled to.
I prefer using sticks that aren’t overly thin and have some pliability.
Once you have your stick make sure to cleanse it making a “blank slate” so to speak.
You can now decorate your wand with anything you desire – crystals, ribbon, wire, twine, beads, feathers anything you like.
When you are done, charge the wand using the method you favour whether that be laying it in the Sun, laying it in the moonlight or keeping it with you for a few days.
Your wand is now ready to use  .
Happy crafting
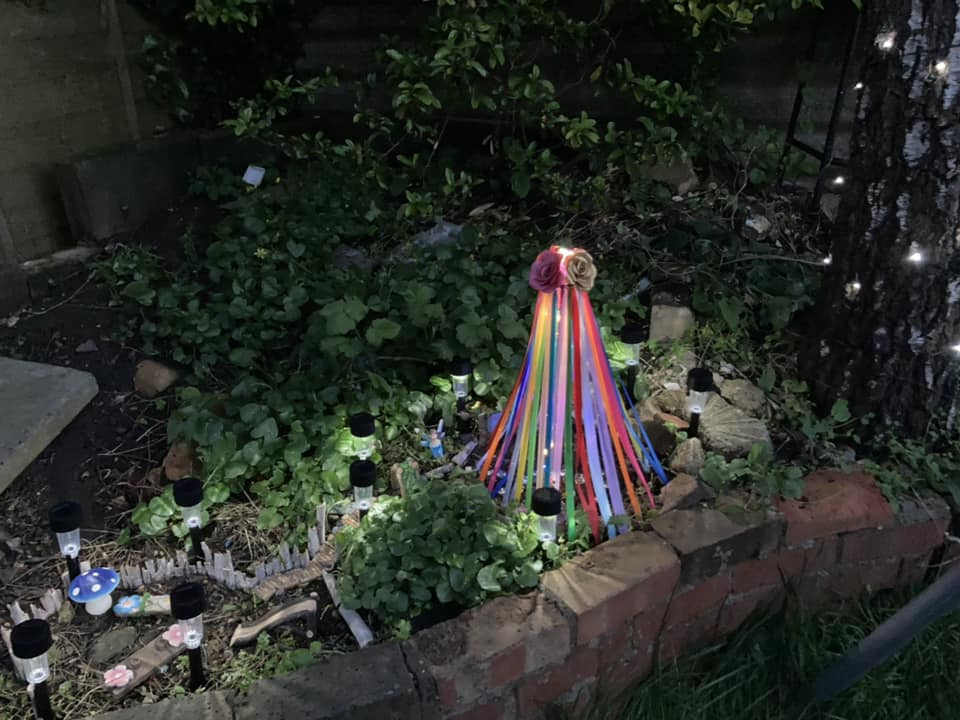
Create a Beltane Maypole For your garden.
The maypole and its accompanying dance has been a spring tradition for thousands of years.
The pole in itself represents a tree and the dance to both in courage and celebrate fertility of the Earth as it has woken from its winter slumber.
Here we are going to create a maypole to place in your garden to celebrate Beltane.
For this craft you will need…
A small ring/hoop
A bamboo cane/stick
String
Selection of ribbons
Scissors
Hot glue
Flowers
Electrical tape *optional*
First cut your bamboo cane or stick to the desired size, and if you wish to you can cover it with the electrical tape. Next you are going to attach the ring/hoop to the top of the cane/stick using the string and a blob of hot glue.
When the hoop is secure cut your length of ribbon and secure to the hoop with a larks head knot.
Once your ring is completely covered with a ribbon you can decorate as desired and display in your garden.